It’s that low, steady hum you barely notice until it’s gone. You walk into the kitchen, grab a carton of milk, and realize the container feels suspiciously lukewarm. Suddenly, that silent kitchen feels a lot more expensive. Before you panic and start scrolling through the latest French-door models on a retail site, you need to figure out if the heart of the machine—the compressor—is actually dead or just having a temporary meltdown.
Learning how to test fridge compressor health is basically the difference between a $15 part and an $800 repair bill. Most people assume a warm fridge means a dead compressor. Honestly? That's not always true. It could be a $20 start relay or a blown capacitor.
Let's be real: working with electricity is intimidating. You’re dealing with high voltage and specialized tools like multimeters. But if you can follow a few basic safety steps, you can diagnose this yourself. No fake "repair hacks" here—just the actual physics of how these pumps work.
The Anatomy of a Failing Pump
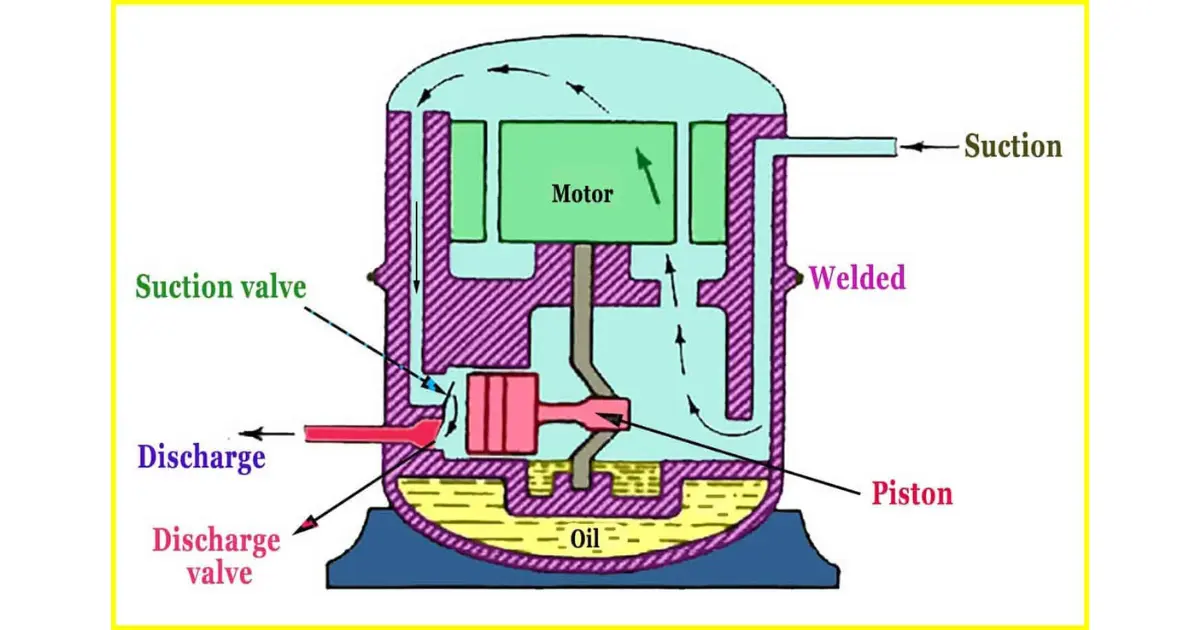
The compressor is essentially a pump driven by an electric motor. Inside that black, dome-shaped tank at the back of your fridge, there are electrical windings. These are coils of wire. When electricity flows through them, they create a magnetic field that moves a piston. That piston compresses refrigerant gas. If those wires touch each other (a short) or touch the metal casing (a ground fault), the motor dies.
Sometimes the failure isn't electrical. It’s mechanical. You might hear a "click-buzz-click" sound. That’s usually the click of the thermal overload protector. It’s trying to save the motor from burning up because the compressor is stuck or the start relay has failed. Think of the start relay like a car’s starter motor; if it’s shot, the engine won't turn over no matter how much gas you give it.
Getting the Gear Ready
You can't eyeball an electrical short. You need a digital multimeter. You don't need a $400 Fluke, but a decent one that can measure "Ohms" (resistance) and has a continuity setting is non-negotiable.
Safety first. Unplug the fridge. I’m serious. Don't just turn it off at the thermostat. Pull the plug from the wall. You'll be touching terminals that carry enough current to ruin your week. Once it’s unplugged, pull the fridge away from the wall so you can get to the back panel. You’ll see a cardboard or metal cover at the bottom. Unscrew it.
How to Test Fridge Compressor Terminals for Continuity
Once you get that back panel off, you’ll see the compressor. It’s that big, heavy black pot. On the side of it, there’s usually a plastic cover protecting the electrical connections. Pop that off. You’ll find the start relay and/or capacitor plugged directly onto three metal pins sticking out of the compressor.
Pull the relay off the pins. Be gentle. You don't want to snap those pins. Now you’re looking at three pins arranged in a triangle. These are typically labeled (or understood as) Common (C), Start (S), and Run (R).
The Resistance Test
Set your multimeter to the lowest Ohms setting ($\Omega$). You’re looking for specific resistance values between these three pins.
- Common to Start: This should show a specific reading, usually between 3 and 11 Ohms.
- Common to Run: This is typically a lower number, maybe 1 to 5 Ohms.
- Start to Run: This should be the sum of the other two readings. If $C-S$ is 5 and $C-R$ is 3, then $S-R$ should be about 8.
If you see an "O.L" (Open Line) or an "I" (Infinite) reading on any of these combinations, the internal windings are broken. The compressor is toast. It's an internal "open circuit." No amount of tapping on it with a hammer is going to fix that.
The Ground Test (The Danger Check)
This is the most important part of how to test fridge compressor safety. You need to make sure the electricity isn't leaking into the frame of the fridge. Keep your multimeter on the Ohms setting. Touch one probe to one of the three pins. Touch the other probe to a clean, unpainted piece of the compressor’s metal casing or the copper suction line.
If the multimeter shows any reading at all—even a tiny bit—the compressor is grounded. This means the insulation on the wires inside has melted and is touching the metal. If you plug this fridge back in, it could shock you or trip your circuit breaker instantly. A grounded compressor is a "replace the whole fridge" situation for most people, as the cost of a compressor swap often rivals a new unit.
Don't Forget the Start Relay
Before you mourn your appliance, check the relay you just pulled off. This is a very common failure point. There’s a "pro tip" for this that sounds ridiculous but actually works: the shake test.
Take the start relay—it’s that small plastic block—and shake it near your ear. Do you hear a rattling sound? Like there are broken bits of ceramic inside? If it rattles, it’s broken. Inside these relays is a small ceramic disk that allows a burst of power to start the motor and then cuts off. These disks get brittle and shatter over time. A rattling relay is a $20 fix that saves you from buying a new $2,000 fridge.
When the Compressor is Just "Stuck"
Sometimes the electronics are fine, but the mechanical parts are seized. This happens a lot if the fridge has been sitting unused for years. Experts sometimes use a "Hard Start Kit" or a "3-n-1 Starter." This is basically a heavy-duty capacitor and relay combo that gives the compressor a massive jolt of electricity to "break" it loose.
It’s a bit of a Hail Mary. If a compressor needs a hard start kit to run, it’s already on its last legs. But it can buy you six months or a year while you save up for a replacement. Just be aware that these kits can run the motor hotter than intended.
Real-World Nuance: The Inverter Compressor
If you have a very modern, high-end fridge (like a Samsung or LG linear compressor model), the rules change. These don't always use the standard three-pin $C-S-R$ setup. They use Inverter technology.
Inverter compressors take DC voltage and vary the speed. You cannot test these by just plugging them into a wall outlet, and your Ohm readings might be identical across all three pins (e.g., 10 Ohms between every combination). If you have an inverter fridge, you're usually looking for a diagnostic LED on the main control board at the back. That LED will blink in a specific pattern to tell you if the compressor or the inverter board is the culprit.
Actionable Steps for a Warm Fridge
If you’ve gone through these tests and you’re still not sure, follow this logic flow to narrow it down:
- Check the Fans First: Is the fan next to the compressor spinning? Is the fan inside the freezer spinning? If the compressor is hot to the touch but the fans are dead, the compressor is overheating and shutting itself off. Clean your condenser coils. Dust is a silent killer.
- The "Click" Test: Sit by the fridge for 10 minutes. If you hear a click, followed by a hum for 5 seconds, followed by another click, your compressor is trying to start but failing. This is almost always the start relay or a seized motor.
- Confirm Voltage: Use your multimeter to ensure the fridge is actually sending 120V to the compressor. If there’s no power at the wires leading to the compressor, your problem is the thermostat or the main control board, not the pump.
- Professional Assessment: If the compressor is running (it’s vibrating and warm) but the fridge isn't cold, you likely have a sealed system leak or a blockage. This is not a DIY fix. You need a licensed HVAC technician to handle refrigerant.
Testing a compressor isn't just about finding out if it's dead; it's about ruling out the cheap stuff first. Always start with the relay, move to the resistance test, and finally check for ground faults. If you find an open winding or a grounded pin, start shopping for a new fridge. If the windings look good, grab a new $25 start relay and see if she fires up. You might just save yourself a few grand today.