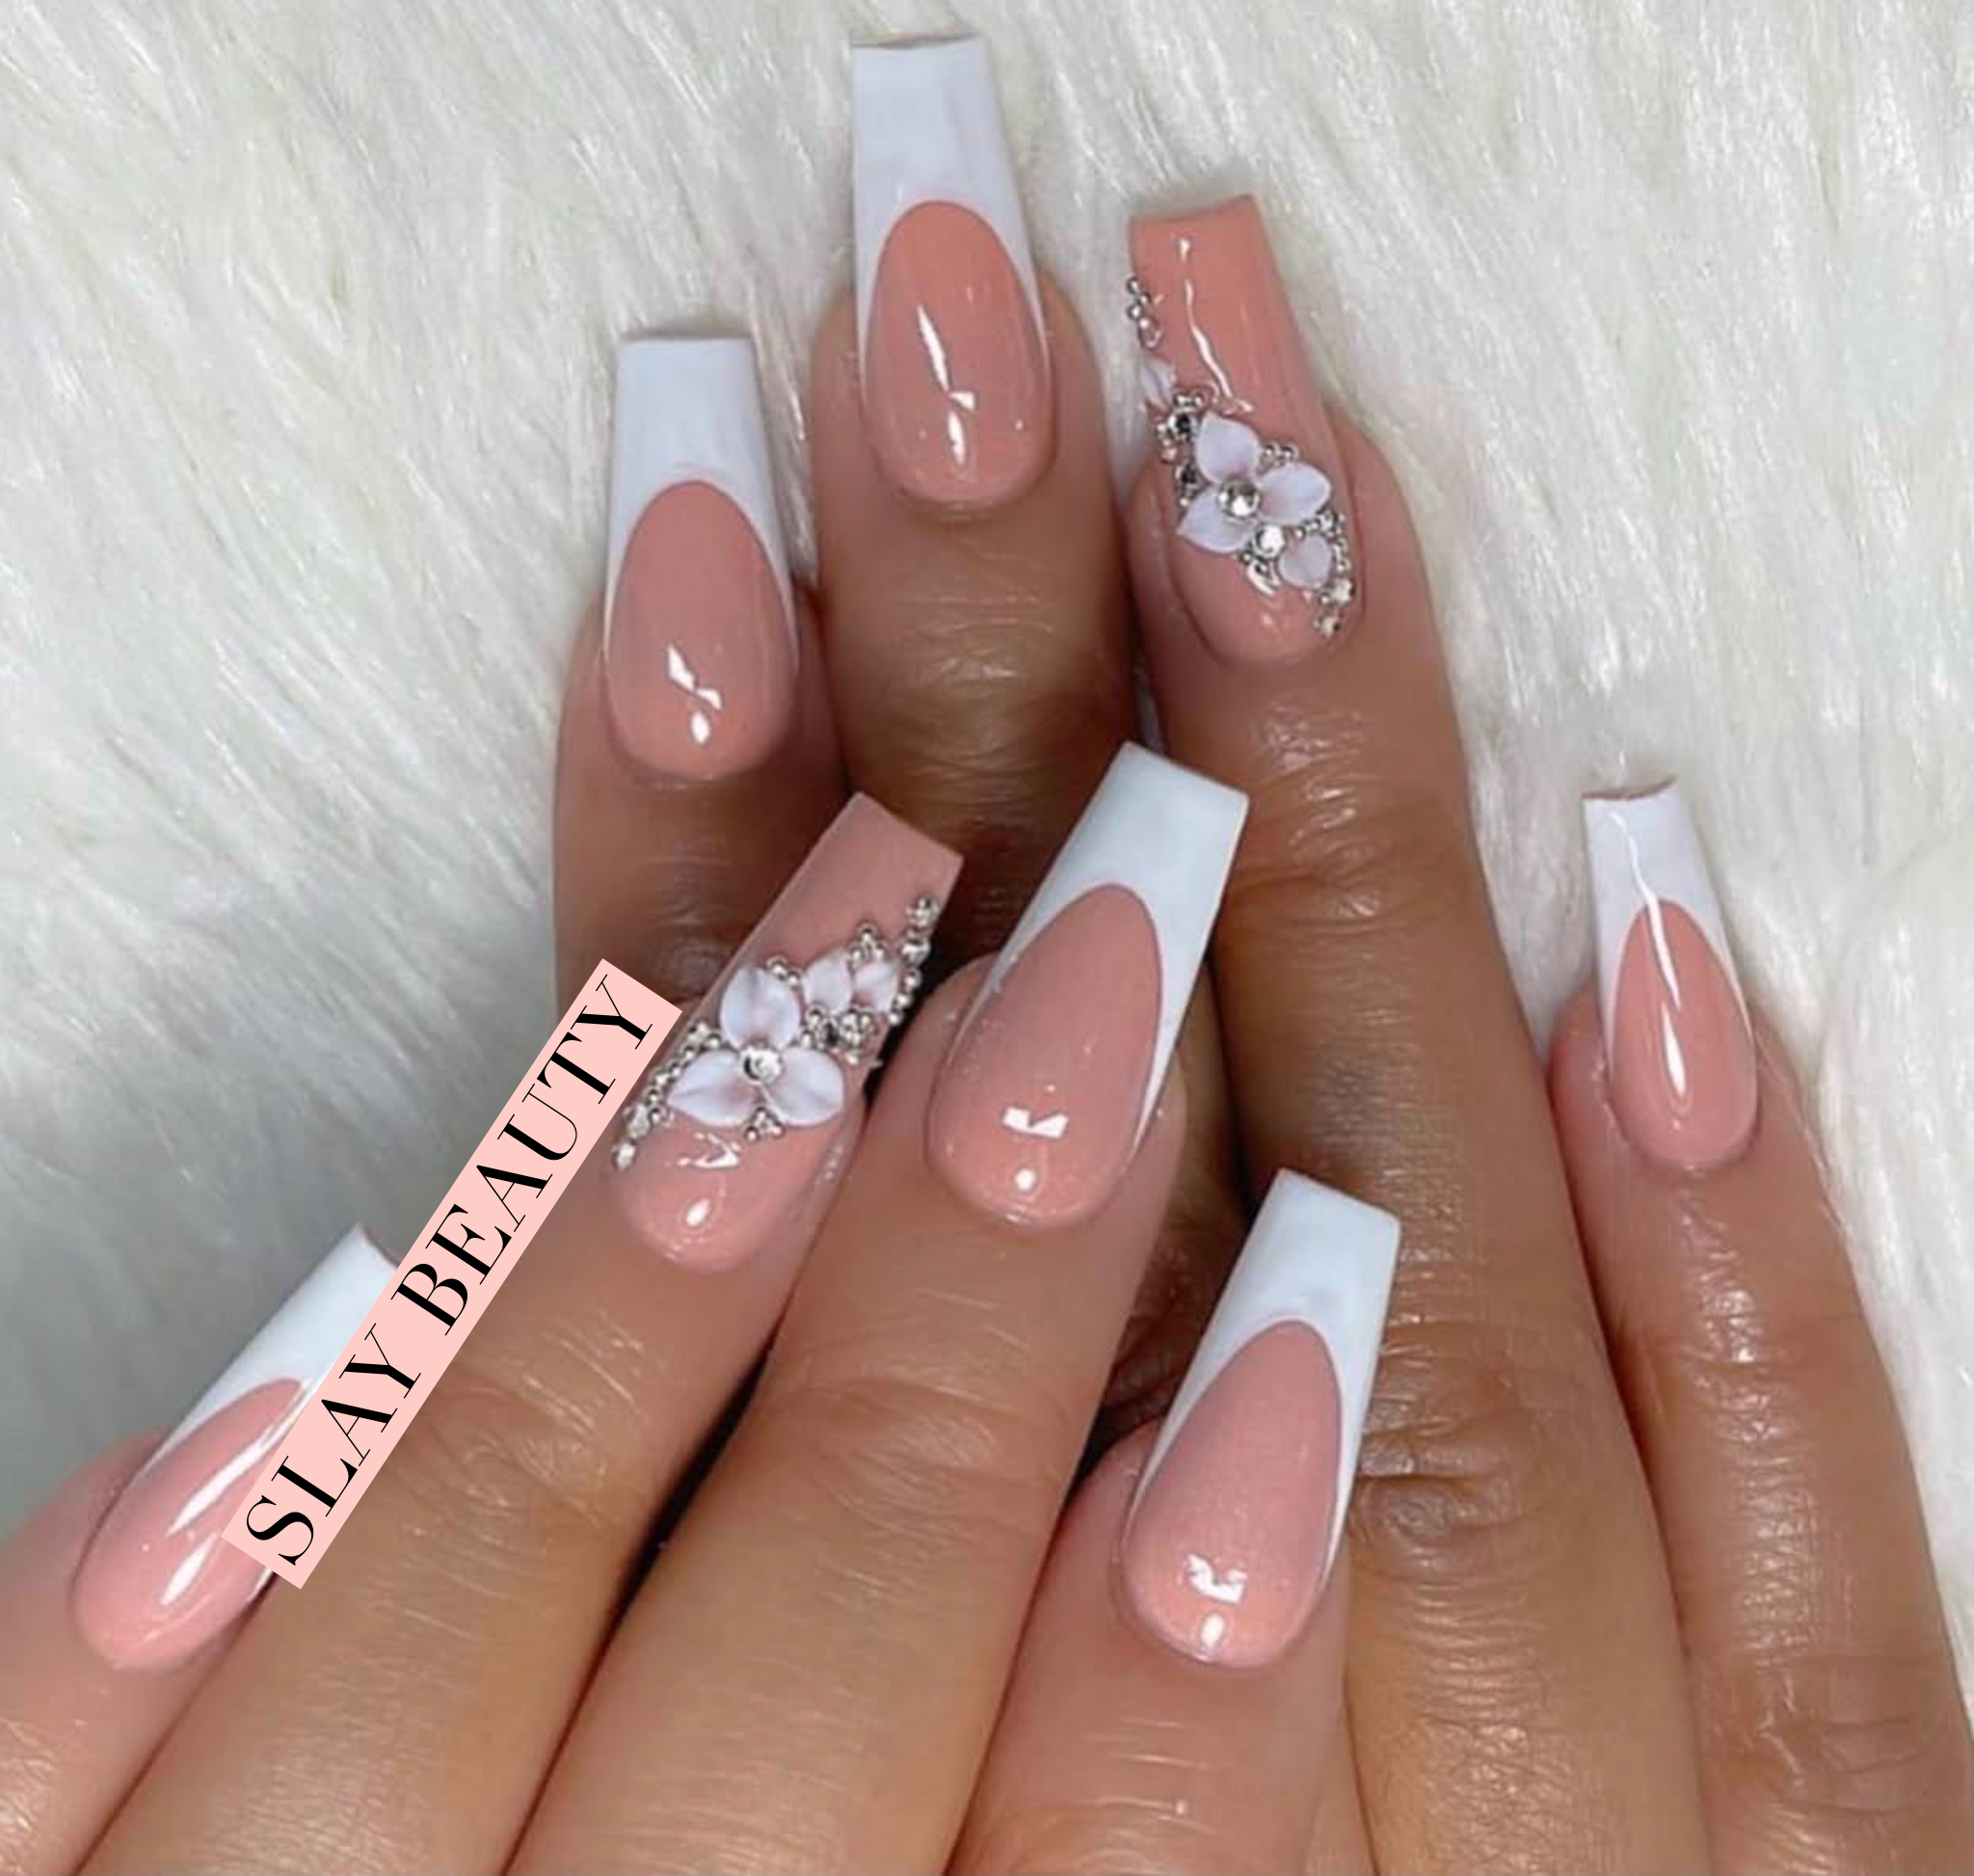
The French tip isn’t dead. Honestly, it’s just evolved into something much more expensive-looking. We’ve moved past those chunky, thick white crescents from 2004. Today, if you aren't wearing a french manicure with bling, you're missing out on the easiest way to make your hands look like they belong to a woman who actually has her life together. It’s that perfect middle ground. You get the clean, minimalist vibe of a classic French, but the sparkle adds a "look at me" factor that stops it from being boring.
People think adding stones to a French tip is easy. It’s not. There is a very thin line between "luxury bridal" and "I let a toddler play with a bedazzler."
Why the French Manicure With Bling Is Dominating Salons Right Now
Trends move fast. Last year it was all about "clean girl" nails—totally sheer, almost invisible. But humans get bored. We want texture. We want light. The french manicure with bling took off because it works on every single nail shape. Whether you’re rocking short squares or those aggressive Cardi B stilettos, crystals just work.
I’ve seen it at every major nail expo lately. Expert techs like Betina Goldstein have pioneered this "micro-bling" movement. It’s not about covering the whole nail. It’s about placement. One tiny Swarovski crystal at the cuticle or a line of silver glitter tracing the "smile line" changes the entire geometry of your hand.
It makes your fingers look longer. Really. By drawing the eye to the very tip or the very base with a reflective element, you create an optical illusion of length.
The Evolution of the "Smile Line"
We used to just paint a white arc and call it a day. Now? The "smile line"—that’s the curve where the pink meets the white—is a playground. Some people are doing "double French" where you have two thin lines of glitter. Others are doing "deconstructed" French tips where the bling is the tip. Instead of white polish, you use 3D rhinestones to form the shape of the crescent. It’s bold. It’s tactile. You’ll find yourself running your thumb over the stones all day. It's a sensory experience.
Real Talk on Rhinestone Longevity
Let’s be real for a second. The biggest fear with a french manicure with bling is losing a "tooth." You know what I mean. You reach into your bag to find your keys, and clack—there goes a crystal. Now you have a weird, sticky gap on your ring finger that looks like a missing tooth.
If your tech is just using regular top coat to stick those stones down, run.
Professional-grade charms require resin or a specific "jewelry gel." This stuff is thick. It’s basically structural glue for your nails. If you’re doing this at home, don't use superglue. It clouds the crystal. The back of a high-quality rhinestone has a foil coating to reflect light; superglue eats that foil. Use a dedicated nail glue or a UV-curable gem gel.
- Pro Tip: Always wrap your top coat around the base of the stone, never over the top. If you put top coat over a faceted crystal, you turn it into a dull plastic lump. It loses the sparkle. You want those facets exposed to the air so they catch the sun.
Choosing Your Bling Style: Beyond Just Clear Stones
White diamonds are the default, sure. But we’ve seen a huge shift toward "aurora borealis" (AB) crystals. These have an iridescent coating that shifts from blue to gold to pink depending on how you move your hand. It’s hypnotic.
Then there’s the "pearl French." Instead of stones, you use tiny half-pearls. It’s very Chanel. Very "old money." If you want a french manicure with bling that feels sophisticated enough for a boardroom but cool enough for a bar, pearls are the move.
- The Cuticle Accent: One single stone at the base of the nail. Minimalist.
- The Glitter Gradient: A French tip that fades from solid white into silver holographic glitter.
- The Side-Swoop: Crystals cascading down just one side of the nail.
- The Full Bling Tip: No polish at all, just a solid wall of tiny crystals at the edge.
The Shape Matters More Than You Think
You can't just slap a french manicure with bling on any old nail and expect it to look like a Pinterest board. Almond is the gold standard here. The soft curve of an almond nail mimics the natural curve of the cuticle, making the French tip look more organic.
Square nails give off a more "Y2K" retro vibe. If you’re going square, keep the bling symmetrical. If you’re going stiletto, you can get a bit more chaotic with the stone placement because you have so much real estate to work with.
Short nails? Don't think you're left out. A "micro-French"—where the tip is thinner than a strand of spaghetti—paired with a single microscopic crystal is arguably the chicest version of this trend. It says you have taste but you don't need to shout.
Common Mistakes People Make with Sparkly Frenchies
Biggest mistake: Too many colors. If you’re doing a classic white French tip, stick to clear or silver stones. If you start adding red, blue, and green rhinestones, it starts looking like a Christmas tree. Keep the palette tight.
Another one? Wrong base color. A french manicure with bling lives or dies by the "nude" polish underneath. If the pink is too opaque, it looks like plastic. If it’s too sheer, you see the "quick" of your nail (the red part), which can look a bit messy. You want a "your nails but better" sheer peach or soft lilac-pink. Brands like OPI or Bio Seaweed Gel have perfected these "bare" shades.
Maintenance and the "Hair Snag" Test
If you can’t run your fingers through your hair without a crystal catching a strand, the manicure is poorly executed. This is the ultimate test. Your nail tech should "bead" a tiny bit of top coat around the edges of every stone to create a smooth ramp. This prevents snagging.
If you do lose a stone at home, don't panic. You can fill the gap with a dot of glitter polish until your next appointment. It’s a literal band-aid for your nails.
Actionable Steps for Your Next Salon Visit
Stop just asking for "French with some sparkles." Be specific so you don't end up disappointed.
First, decide on your "bling density." Do you want an accent nail (usually the ring finger) or "scattered" bling on every finger? Scattered usually looks more intentional and high-fashion.
Second, choose your stone size. SS3 and SS5 are the tiny ones that look like diamond dust. SS10 and up are the big "statement" stones. Mixing sizes—what techs call "the cluster effect"—looks much more expensive than using five stones that are all the exact same size.
Third, check the "smile line" height. A deep smile line (one that curves way down the sides of the nail) is very slimming for wide nail beds. A shallow, flatter line is better for very long nails to prevent them from looking like horse hooves.
When you sit in that chair, tell your tech you want a "structured" french manicure with bling. This implies you want the strength of a builder gel to support the weight of the stones. It’ll last three weeks instead of one.
Bring a photo. But not just any photo—find one that has the same nail shape as your own. Trying to translate a design from a long stiletto onto a short square is how "nail fails" happen.
Keep your cuticles hydrated with oil. Bling draws attention to the base of the nail. If your cuticles are dry and crusty, those expensive crystals are just highlighting the mess. A quick drop of jojoba oil every night keeps the skin looking as polished as the stones.
Once you go for the french manicure with bling, it’s hard to go back to plain polish. There’s something about the way your nails catch the light when you’re typing or holding a coffee cup that just gives you a little hit of dopamine. It’s small, it’s superficial, but honestly? It’s a vibe.