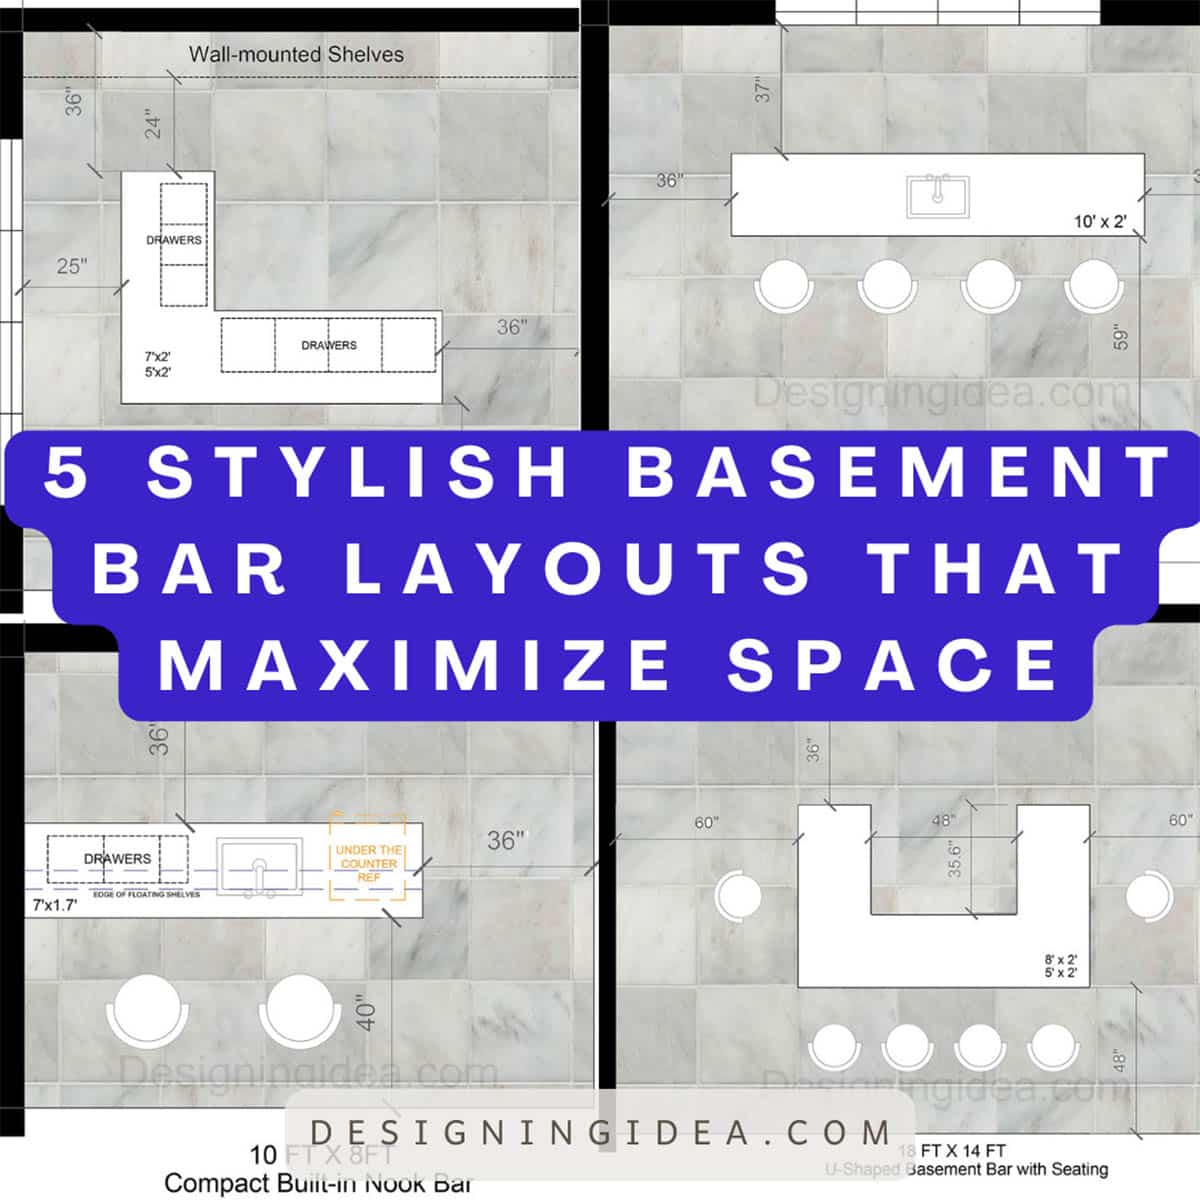
You’re standing in a cold, concrete rectangle. It smells like old cardboard and laundry detergent. Most people see a storage graveyard, but you? You see a mahogany countertop, the soft hum of a draft system, and the kind of lighting that makes everyone look like they’re in a 1920s speakeasy. That’s the dream. But designing a basement bar is less about picking out cool stools and more about wrestling with floor drains, ceiling heights, and the physics of refrigeration in a space that was never meant to be a lounge. Honestly, most DIYers and even some contractors blow the budget on the wrong things because they treat the basement like a kitchen. It isn't a kitchen. It's a subterranean ecosystem with its own set of rules.
If you don’t plan for the moisture or the "cave effect," you’ll end up with a very expensive room that nobody wants to sit in for more than ten minutes.
The Plumbing Nightmare Nobody Mentions
Plumbing is the literal foundation of a good bar. In a kitchen, you have gravity on your side. In a basement? Not so much. Unless your home was pre-plumbed with a rough-in for a wet bar, you’re likely looking at concrete demolition. You have to jackhammer the floor to lay drain lines that slope toward your main sewer stack. It’s loud. It’s dusty. It’s expensive.
Some people try to cheat this by using a macerating pump system—basically a "sump pump" for your sink. Companies like Saniflo make these, and while they work, they make a distinct grinding noise every time you rinse a glass. It’s a vibe killer. If you can, go the "trenching" route. It’s a one-time pain that ensures your bar functions like a real part of the house. Also, think about your ice. Real ice makers—not the ones in a fridge—require a dedicated drain because the ice is constantly melting and being replaced. This is a huge detail people miss until they have a puddle on their new LVP flooring.
Designing a Basement Bar Around Lighting (Not Just Pot Lights)
Basements are dark. This is obvious, right? But the mistake people make is overcompensating by installing twelve recessed "can" lights and turning the dimmer up to 100. Now your cozy bar looks like a surgical suite. Terrible.
To get that actual bar feel, you need layers. You want "puddle" lighting. This is where light hits a surface—like the bar top or a bottle display—and stays there, leaving the corners of the room in soft shadow. Use LED tape lights under the lip of the bar and behind the shelving. It’s cheap, it’s easy to hide, and it creates that "glow" that makes liquor bottles look like jewels.
Keep your ceiling lights on a separate dimmer from your bar lights. Better yet, use warm-toned bulbs, somewhere around 2700K. Anything higher than 3000K starts feeling like an office building. You want the space to feel intimate, not clinical.
The Ergonomics of the "Pull"
Have you ever sat at a bar and felt like your knees were hitting a wall? Or the counter felt too high? There are industry standards for a reason. A standard bar height is 42 inches. Your stools should have a seat height of about 30 inches.
But here is the secret: the "overhang." You need at least 10 to 12 inches of space for your legs to tuck under the counter. If you’re building a "dry bar" against a wall, you can get away with less, but for a "walk-up" bar where people are actually hanging out, don't skimp on the overhang. Also, think about the "work triangle." Even in a small bar, you want the sink, the fridge, and the trash to be within a few steps of each other. Nobody wants to walk across the room to throw away a lime wedge.
Materials That Won't Rot
Basements are humid. It’s just their nature. Even with a high-end dehumidifier, moisture migrates through concrete. This means that if you use cheap MDF (Medium Density Fiberboard) for your bar cabinets, they will eventually swell and fall apart. It sucks, but it's true.
Go with solid wood or high-quality plywood. For the floors, skip the hardwood. It warps. Use Luxury Vinyl Plank (LVP) or tile. LVP is basically the king of basement flooring now because it looks like wood, it’s waterproof, and it’s relatively soft underfoot compared to stone.
For the bar top itself, granite and quartz are great, but they are cold to the touch. In a basement that’s already chilly, resting your arms on a slab of ice-cold stone isn't great. This is why wood tops (like walnut or maple with a heavy marine-grade sealer) are so popular for basement bars. They feel "warmer" and more inviting. Just be prepared to use coasters.
The Sound Problem
Basements are usually echo chambers. Concrete floors, drywall ceilings, and hard bar tops reflect sound everywhere. If you have a TV down there for the game, the audio is going to bounce around and sound muddy.
You need "soft" stuff to soak up the noise.
- Area rugs: Put a heavy rug in the seating area.
- Acoustic panels: You can get ones that look like art or wood slats.
- Upholstered stools: Leather or fabric seats help more than metal ones.
- Dropped ceilings: If you haven't finished the ceiling yet, consider acoustic ceiling tiles or even a "cloud" feature over the bar.
HVAC and the "Stale Air" Issue
People forget that when you put four or five humans in a small basement room and turn on a couple of fridges, it gets hot. Fridges kick out a massive amount of heat from their compressors. If your bar is tucked into a corner with no airflow, that heat just sits there.
Ensure your HVAC system has an "out" in the bar area. If you’re really serious, install a small exhaust fan—sort of like a bathroom fan but quieter—to pull out stale air and the smell of spilled beer. It makes a world of difference for the long-term comfort of the room.
Real-World Case: The "Speakeasy" vs. The "Sports Bar"
Think about how you actually drink. I knew a guy who built a massive, bright-white sports bar with four TVs. He realized six months later he hated it because he mostly used the space to sip bourbon and read at night. The bright lights and white cabinets felt "loud."
Conversely, if you're hosting 15 people for the Super Bowl, a dark, moody speakeasy with two velvet chairs isn't going to work.
The Sports Bar Setup: Focus on durable surfaces. Think stainless steel, quartz, and lots of outlets for slow cookers (wings/nachos). You need a big fridge—maybe even a kegerator.
The Speakeasy Setup: Focus on the "back bar" display. Use mirrors to make the space feel deeper. Spend your money on a high-end glass washer and specialized ice molds. Lighting is everything here.
Designing a basement bar requires a "systems-first" mindset. You can't just slap some cabinets in a corner and call it a day. You have to account for the water, the air, and the way sound travels in a subterranean environment.
Next Steps for Your Project:
- Check your floor slope: Pour a little water where you want the bar to go. See where it runs. This tells you where your drainage challenges lie.
- Measure your ceiling height: Remember that if you add a subfloor and a ceiling, you might lose 4-6 inches. Ensure your 42-inch bar doesn't make the room feel like a crawlspace.
- Audit your electrical panel: A fridge, a microwave, and a wine cooler on one circuit will trip your breaker. You likely need at least two dedicated 20-amp circuits for a full bar setup.
- Consult a plumber early: Before you buy a single board of wood, get a pro to tell you if your drainage plan is physically possible without costing $10,000.
Designing this space is a marathon. Take the time to get the "ugly" stuff—the pipes and wires—right, and the "pretty" stuff will actually be enjoyable once it's finished.